Chapter 3. Creating applications
3.1. Creating applications by using the Developer perspective
Create and deploy applications on Red Hat OpenShift Service on AWS by using the Developer perspective in the web console.
The Developer perspective in the web console provides you the following options from the +Add view to create applications and associated services and deploy them on Red Hat OpenShift Service on AWS:
Starting with Red Hat OpenShift Service on AWS 4.19, the perspectives in the web console have unified. The Developer perspective is no longer enabled by default.
All users can interact with all Red Hat OpenShift Service on AWS web console features. However, if you are not the cluster owner, you might need to request permission to access certain features from the cluster owner.
You can still enable the Developer perspective. On the Getting Started pane in the web console, you can take a tour of the console, find information on setting up your cluster, view a quick start for enabling the Developer perspective, and follow links to explore new features and capabilities.
See also, "Enabling the Developer perspective in the web console".
Getting started resources: Use these resources to help you get started with Developer Console. You can choose to hide the header using the Options menu
 .
.
- Creating applications using samples: Use existing code samples to get started with creating applications on the Red Hat OpenShift Service on AWS.
- Build with guided documentation: Follow the guided documentation to build applications and familiarize yourself with key concepts and terminologies.
- Explore new developer features: Explore the new features and resources within the Developer perspective.
Developer catalog: Explore the Developer Catalog to select the required applications, services, or Source-to-Image (S2I) builders, and then add it to your project.
- All Services: Browse the catalog to discover services across Red Hat OpenShift Service on AWS.
- Database: Select the required database service and add it to your application.
- Operator Backed: Select and deploy the required Operator-managed service.
- Helm chart: Select the required Helm chart to simplify deployment of applications and services.
- Devfile: Select a devfile from the Devfile registry to declaratively define a development environment.
Event Source: Select an event source to register interest in a class of events from a particular system.
NoteThe Managed services option is also available if the RHOAS Operator is installed.
- Git repository: Import an existing codebase, Devfile, or Dockerfile from your Git repository using the From Git, From Devfile, or From Dockerfile options respectively, to build and deploy an application on Red Hat OpenShift Service on AWS.
- Container images: Use existing images from an image stream or registry to deploy it on to the Red Hat OpenShift Service on AWS.
- Pipelines: Use Tekton pipeline to create CI/CD pipelines for your software delivery process on the Red Hat OpenShift Service on AWS.
Serverless: Explore the Serverless options to create, build, and deploy stateless and serverless applications on the Red Hat OpenShift Service on AWS.
- Channel: Create a Knative channel to create an event forwarding and persistence layer with in-memory and reliable implementations.
- Samples: Explore the available sample applications to create, build, and deploy an application quickly.
- Quick Starts: Explore the quick start options to create, import, and run applications with step-by-step instructions and tasks.
From Local Machine: Explore the From Local Machine tile to import or upload files on your local machine for building and deploying applications easily.
- Import YAML: Upload a YAML file to create and define resources for building and deploying applications.
- Upload JAR file: Upload a JAR file to build and deploy Java applications.
- Share my Project: Use this option to add or remove users to a project and provide accessibility options to them.
- Helm Chart repositories: Use this option to add Helm Chart repositories in a namespace.
- Re-ordering of resources: Use these resources to re-order pinned resources added to your navigation pane. The drag-and-drop icon is displayed on the left side of the pinned resource when you hover over it in the navigation pane. The dragged resource can be dropped only in the section where it is located.
Note that the Pipelines option is displayed only when the OpenShift Pipelines Operator is installed.
3.1.1. Prerequisites
To create applications by using the Developer perspective, ensure that the following requirements are met:
- You have logged in to the web console.
3.1.2. Create sample applications
You can use the sample applications in the +Add flow of the Developer perspective to create, build, and deploy applications quickly.
Prerequisites
- You have logged in to the Red Hat OpenShift Service on AWS web console and are in the Developer perspective.
Procedure
- In the +Add view, click the Samples tile to see the Samples page.
- On the Samples page, select one of the available sample applications to see the Create Sample Application form.
In the Create Sample Application Form:
- In the Name field, the deployment name is displayed by default. You can modify this name as required.
- In the Builder Image Version, a builder image is selected by default. You can modify this image version by using the Builder Image Version drop-down list.
- A sample Git repository URL is added by default.
- Click Create to create the sample application. The build status of the sample application is displayed on the Topology view. After the sample application is created, you can see the deployment added to the application.
3.1.3. Creating applications by using Quick Starts
The Quick Starts page shows you how to create, import, and run applications on Red Hat OpenShift Service on AWS, with step-by-step instructions and tasks.
Prerequisites
- You have logged in to the Red Hat OpenShift Service on AWS web console and are in the Developer perspective.
Procedure
-
In the +Add view, click the Getting Started resources
Build with guided documentation View all quick starts link to view the Quick Starts page. - In the Quick Starts page, click the tile for the quick start that you want to use.
- Click Start to begin the quick start.
- Perform the steps that are displayed.
3.1.4. Import a codebase from Git to create an application
You can use the Developer perspective to create, build, and deploy an application on Red Hat OpenShift Service on AWS using an existing codebase in GitHub.
The following procedure walks you through the From Git option in the Developer perspective to create an application.
Procedure
- In the +Add view, click From Git in the Git Repository tile to see the Import from git form.
-
In the Git section, enter the Git repository URL for the codebase you want to use to create an application. For example, enter the URL of this sample Node.js application
https://github.com/sclorg/nodejs-ex. The URL is then validated. Optional: You can click Show Advanced Git Options to add details such as:
- Git Reference to point to code in a specific branch, tag, or commit to be used to build the application.
- Context Dir to specify the subdirectory for the application source code you want to use to build the application.
- Source Secret to create a Secret Name with credentials for pulling your source code from a private repository.
Optional: You can import a
Devfile, aDockerfile,Builder Image, or aServerless Functionthrough your Git repository to further customize your deployment.-
If your Git repository contains a
Devfile, aDockerfile, aBuilder Image, or afunc.yaml, it is automatically detected and populated on the respective path fields. -
If a
Devfile, aDockerfile, or aBuilder Imageare detected in the same repository, theDevfileis selected by default. -
If
func.yamlis detected in the Git repository, the Import Strategy changes toServerless Function. - Alternatively, you can create a serverless function by clicking Create Serverless function in the +Add view using the Git repository URL.
- To edit the file import type and select a different strategy, click Edit import strategy option.
-
If multiple
Devfiles, aDockerfiles, or aBuilder Imagesare detected, to import a specific instance, specify the respective paths relative to the context directory.
-
If your Git repository contains a
After the Git URL is validated, the recommended builder image is selected and marked with a star. If the builder image is not auto-detected, select a builder image. For the
https://github.com/sclorg/nodejs-exGit URL, by default the Node.js builder image is selected.- Optional: Use the Builder Image Version drop-down to specify a version.
- Optional: Use the Edit import strategy to select a different strategy.
- Optional: For the Node.js builder image, use the Run command field to override the command to run the application.
In the General section:
-
In the Application field, enter a unique name for the application grouping, for example,
myapp. Ensure that the application name is unique in a namespace. The Name field to identify the resources created for this application is automatically populated based on the Git repository URL if there are no existing applications. If there are existing applications, you can choose to deploy the component within an existing application, create a new application, or keep the component unassigned.
NoteThe resource name must be unique in a namespace. Modify the resource name if you get an error.
-
In the Application field, enter a unique name for the application grouping, for example,
In the Resources section, select:
- Deployment, to create an application in plain Kubernetes style.
- Deployment Config, to create an Red Hat OpenShift Service on AWS style application.
Serverless Deployment, to create a Knative service.
NoteTo set the default resource preference for importing an application, go to User Preferences
Applications Resource type field. The Serverless Deployment option is displayed in the Import from Git form only if the OpenShift Serverless Operator is installed in your cluster. The Resources section is not available while creating a serverless function. For further details, refer to the OpenShift Serverless documentation.
In the Pipelines section, select Add Pipeline, and then click Show Pipeline Visualization to see the pipeline for the application. A default pipeline is selected, but you can choose the pipeline you want from the list of available pipelines for the application.
NoteThe Add pipeline checkbox is checked and Configure PAC is selected by default if the following criterias are fulfilled:
- Pipeline operator is installed
-
pipelines-as-codeis enabled -
.tektondirectory is detected in the Git repository
Add a webhook to your repository. If Configure PAC is checked and the GitHub App is set up, you can see the Use GitHub App and Setup a webhook options. If GitHub App is not set up, you can only see the Setup a webhook option:
-
Go to Settings
Webhooks and click Add webhook. - Set the Payload URL to the Pipelines as Code controller public URL.
- Select the content type as application/json.
-
Add a webhook secret and note it in an alternate location. With
opensslinstalled on your local machine, generate a random secret. - Click Let me select individual events and select these events: Commit comments, Issue comments, Pull request, and Pushes.
- Click Add webhook.
-
Go to Settings
Optional: In the Advanced Options section, the Target port and the Create a route to the application is selected by default so that you can access your application using a publicly available URL.
If your application does not expose its data on the default public port, 80, clear the check box, and set the target port number you want to expose.
Optional: You can use the following advanced options to further customize your application:
- Routing
By clicking the Routing link, you can perform the following actions:
- Customize the hostname for the route.
- Specify the path the router watches.
- Select the target port for the traffic from the drop-down list.
Secure your route by selecting the Secure Route check box. Select the required TLS termination type and set a policy for insecure traffic from the respective drop-down lists.
NoteFor serverless applications, the Knative service manages all the routing options above. However, you can customize the target port for traffic, if required. If the target port is not specified, the default port of
8080is used.
- Domain mapping
If you are creating a Serverless Deployment, you can add a custom domain mapping to the Knative service during creation.
In the Advanced options section, click Show advanced Routing options.
- If the domain mapping CR that you want to map to the service already exists, you can select it from the Domain mapping drop-down menu.
-
If you want to create a new domain mapping CR, type the domain name into the box, and select the Create option. For example, if you type in
example.com, the Create option is Create "example.com".
- Health Checks
Click the Health Checks link to add Readiness, Liveness, and Startup probes to your application. All the probes have prepopulated default data; you can add the probes with the default data or customize it as required.
To customize the health probes:
- Click Add Readiness Probe, if required, modify the parameters to check if the container is ready to handle requests, and select the check mark to add the probe.
- Click Add Liveness Probe, if required, modify the parameters to check if a container is still running, and select the check mark to add the probe.
Click Add Startup Probe, if required, modify the parameters to check if the application within the container has started, and select the check mark to add the probe.
For each of the probes, you can specify the request type - HTTP GET, Container Command, or TCP Socket, from the drop-down list. The form changes as per the selected request type. You can then modify the default values for the other parameters, such as the success and failure thresholds for the probe, number of seconds before performing the first probe after the container starts, frequency of the probe, and the timeout value.
- Build Configuration and Deployment
Click the Build Configuration and Deployment links to see the respective configuration options. Some options are selected by default; you can customize them further by adding the necessary triggers and environment variables.
For serverless applications, the Deployment option is not displayed as the Knative configuration resource maintains the desired state for your deployment instead of a
DeploymentConfigresource.
- Scaling
Click the Scaling link to define the number of pods or instances of the application you want to deploy initially.
If you are creating a serverless deployment, you can also configure the following settings:
-
Min Pods determines the lower limit for the number of pods that must be running at any given time for a Knative service. This is also known as the
minScalesetting. -
Max Pods determines the upper limit for the number of pods that can be running at any given time for a Knative service. This is also known as the
maxScalesetting. - Concurrency target determines the number of concurrent requests desired for each instance of the application at a given time.
- Concurrency limit determines the limit for the number of concurrent requests allowed for each instance of the application at a given time.
- Concurrency utilization determines the percentage of the concurrent requests limit that must be met before Knative scales up additional pods to handle additional traffic.
-
Autoscale window defines the time window over which metrics are averaged to provide input for scaling decisions when the autoscaler is not in panic mode. A service is scaled-to-zero if no requests are received during this window. The default duration for the autoscale window is
60s. This is also known as the stable window.
-
Min Pods determines the lower limit for the number of pods that must be running at any given time for a Knative service. This is also known as the
- Resource Limit
- Click the Resource Limit link to set the amount of CPU and Memory resources a container is guaranteed or allowed to use when running.
- Labels
- Click the Labels link to add custom labels to your application.
- Click Create to create the application and a success notification is displayed. You can see the build status of the application in the Topology view.
3.1.5. Create applications by deploying container image
You can use an external image registry or an image stream tag from an internal registry to deploy an application on your cluster.
Prerequisites
- You have logged in to the Red Hat OpenShift Service on AWS web console and are in the Developer perspective.
Procedure
- In the +Add view, click Container images to view the Deploy Images page.
In the Image section:
- Select Image name from external registry to deploy an image from a public or a private registry, or select Image stream tag from internal registry to deploy an image from an internal registry.
- Select an icon for your image in the Runtime icon tab.
In the General section:
- In the Application name field, enter a unique name for the application grouping.
- In the Name field, enter a unique name to identify the resources created for this component.
In the Resource type section, select the resource type to generate:
-
Select Deployment to enable declarative updates for
PodandReplicaSetobjects. -
Select DeploymentConfig to define the template for a
Podobject, and manage deploying new images and configuration sources. - Select Serverless Deployment to enable scaling to zero when idle.
-
Select Deployment to enable declarative updates for
- Click Create. You can view the build status of the application in the Topology view.
3.1.6. Deploying a Java application by uploading a JAR file
You can use the web console Developer perspective to upload a JAR file by using the following options:
- Navigate to the +Add view of the Developer perspective, and click Upload JAR file in the From Local Machine tile. Browse and select your JAR file, or drag a JAR file to deploy your application.
- Navigate to the Topology view and use the Upload JAR file option, or drag a JAR file to deploy your application.
- Use the in-context menu in the Topology view, and then use the Upload JAR file option to upload your JAR file to deploy your application.
Prerequisites
- The Cluster Samples Operator must be installed by a cluster administrator.
- You have access to the Red Hat OpenShift Service on AWS web console and are in the Developer perspective.
Procedure
- In the Topology view, right-click anywhere to view the Add to Project menu.
- Hover over the Add to Project menu to see the menu options, and then select the Upload JAR file option to see the Upload JAR file form. Alternatively, you can drag the JAR file into the Topology view.
- In the JAR file field, browse for the required JAR file on your local machine and upload it. Alternatively, you can drag the JAR file on to the field. A toast alert is displayed at the top right if an incompatible file type is dragged into the Topology view. A field error is displayed if an incompatible file type is dropped on the field in the upload form.
- The runtime icon and builder image are selected by default. If a builder image is not auto-detected, select a builder image. If required, you can change the version using the Builder Image Version drop-down list.
- Optional: In the Application Name field, enter a unique name for your application to use for resource labelling.
- In the Name field, enter a unique component name for the associated resources.
- Optional: Use the Resource type drop-down list to change the resource type.
- In the Advanced options menu, click Create a Route to the Application to configure a public URL for your deployed application.
- Click Create to deploy the application. A toast notification is shown to notify you that the JAR file is being uploaded. The toast notification also includes a link to view the build logs.
If you attempt to close the browser tab while the build is running, a web alert is displayed.
After the JAR file is uploaded and the application is deployed, you can view the application in the Topology view.
3.1.7. Using the Devfile registry to access devfiles
You can use the devfiles in the +Add flow of the Developer perspective to create an application. The +Add flow provides a complete integration with the devfile community registry. A devfile is a portable YAML file that describes your development environment without needing to configure it from scratch. Using the Devfile registry, you can use a preconfigured devfile to create an application.
Procedure
-
Navigate to Developer Perspective
+Add Developer Catalog All Services. A list of all the available services in the Developer Catalog is displayed. - Under Type, click Devfiles to browse for devfiles that support a particular language or framework. Alternatively, you can use the keyword filter to search for a particular devfile using their name, tag, or description.
- Click the devfile you want to use to create an application. The devfile tile displays the details of the devfile, including the name, description, provider, and the documentation of the devfile.
- Click Create to create an application and view the application in the Topology view.
3.1.8. Use the Developer Catalog to add services or components to your application
You use the Developer Catalog to deploy applications and services based on Operator-backed services such as databases, builder images, and Helm charts that you can add to your project.
The Developer Catalog contains a collection of application components, services, event sources, and source-to-image builders. Cluster administrators can customize the content made available in the catalog.
Procedure
- In the Developer perspective, navigate to the +Add view and from the Developer Catalog tile, click All Services to view all the available services in the Developer Catalog.
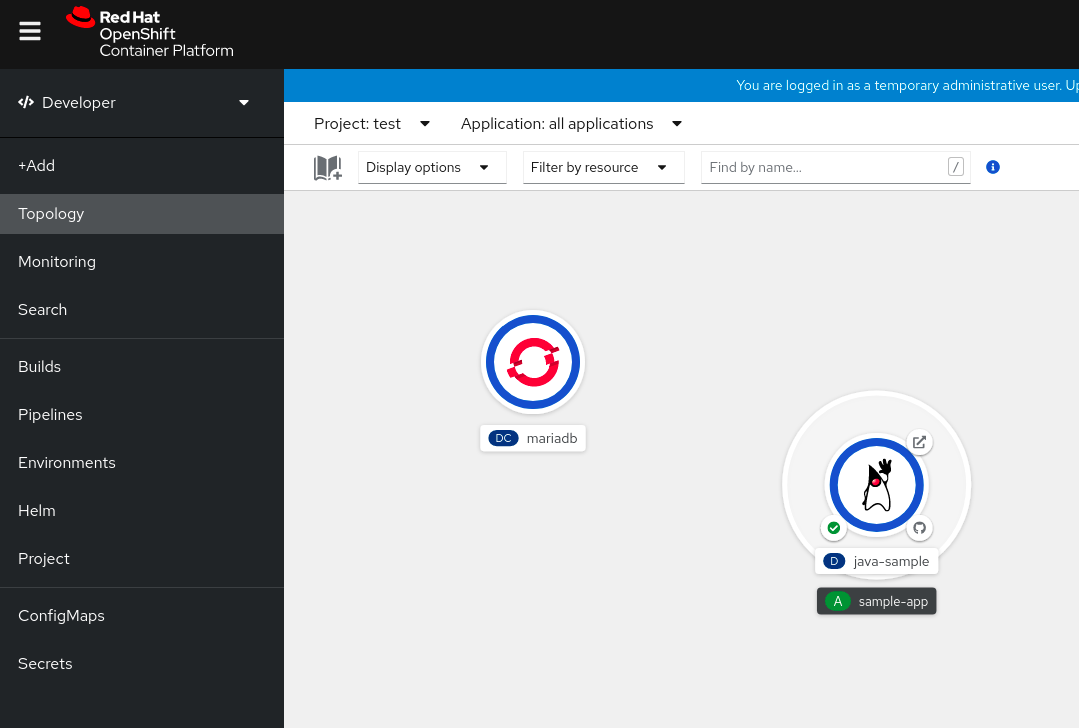
- Under All Services, select the kind of service or the component you need to add to your project. For this example, select Databases to list all the database services and then click MariaDB to see the details for the service.
Click Instantiate Template to see an automatically populated template with details for the MariaDB service, and then click Create to create and view the MariaDB service in the Topology view.
Figure 3.1. MariaDB in Topology
3.2. Creating applications from installed Operators
You can deploy applications on your Red Hat OpenShift Service on AWS cluster from Operators that a cluster administrator installed. Use the Installed Operators page in the web console to create an application from an Operator custom resource (CR) API.
3.2.1. Creating an etcd cluster using an Operator
You can create an etcd cluster using the etcd Operator in the Red Hat OpenShift Service on AWS web console. The Operator creates the pods, services, and other cluster resources for you.
Prerequisites
- Access to a Red Hat OpenShift Service on AWS cluster.
- The etcd Operator already installed cluster-wide by an administrator.
Procedure
-
Create a new project in the Red Hat OpenShift Service on AWS web console for this procedure. This example uses a project called
my-etcd. Navigate to the Ecosystem
Installed Operators page. The Operators installed on the cluster by the dedicated-admin and available for use are shown here as a list of cluster service versions (CSVs). Each CSV launches and manages the software provided by the Operator.
TipYou can get this list from the CLI by running the following command:
$ oc get csvOn the Installed Operators page, click the etcd Operator to view more details and available actions.
As shown under Provided APIs, this Operator makes available three new resource types, including one for an etcd Cluster, the
EtcdClusterresource.These objects work similarly to the built-in native Kubernetes ones, such as
DeploymentorReplicaSet, but contain logic specific to managing etcd.Create a new etcd cluster:
- In the etcd Cluster API box, click Create instance.
-
Optional: Modify the minimal starting template of an
EtcdClusterobject, such as the size of the cluster. - Click Create to finalize. This triggers the Operator to start up the pods, services, and other components of the new etcd cluster.
- Click the example etcd cluster.
Click the Resources tab.
Your project contains several resources that the Operator created and configured.
- Verify that a Kubernetes service exists that allows you to access the database from other pods in your project.
Optional: To grant another user permission to create Operator-managed applications in the project, add the
editrole by running the following command:$ oc policy add-role-to-user edit <user> -n <target_project>Users with the
editrole in a project can create, manage, and delete Operator-managed application instances, such as an etcd cluster.
Results
You have an etcd cluster that reacts to failures and rebalances data as pods become unhealthy or migrate between nodes in the cluster. dedicated-admins or developers with proper access can use the database with their applications.
3.3. Creating applications by using the CLI
You can create applications on your Red Hat OpenShift Service on AWS cluster from a Git repository, a container image, or a template using the oc new-app command. Customize names, labels, environment variables, target projects, and other deployment options with command flags.
3.3.1. Creating an application from source code
You can create an application on your Red Hat OpenShift Service on AWS cluster from a local or remote Git repository using the oc new-app command. Use command flags to target a specific branch or subdirectory, authenticate to a private repository, or control the build strategy and builder image.
Prerequisites
-
You have installed the OpenShift CLI (
oc) and logged in to your cluster. - You have access to a Git repository containing your application source code.
Procedure
Create an application from a Git repository in a local directory by running the following command:
$ oc new-app /<path_to_source_code>NoteIf you use a local Git repository, the repository must have a remote named
originthat points to a URL that is accessible by the Red Hat OpenShift Service on AWS cluster. If there is no recognized remote, running thenew-appcommand creates a binary build.Create an application from a public remote Git repository by running the following command:
$ oc new-app https://github.com/sclorg/cakephp-exCreate an application from a private remote Git repository by running the following command:
$ oc new-app https://github.com/<your_user>/<your_private_repo> --source-secret=yoursecretNoteIf you use a private remote Git repository, use the
--source-secretflag to specify a source clone secret for access to the repository.Use a subdirectory of your source repository by running the following command:
$ oc new-app https://github.com/sclorg/s2i-ruby-container.git \
    --context-dir=2.0/test/puma-test-app
Specify a Git branch by running the following command:
$ oc new-app https://github.com/openshift/ruby-hello-world.git#beta4Override the automatically detected build strategy by running the following command:
$ oc new-app /home/user/code/myapp --strategy=dockerNoteThe
occommand requires that files containing build sources are available in a remote Git repository. For all source builds, you must usegit remote -v.Specify the builder image and source repository:
Specify the builder image and source repository for a remote repository by running the following command:
$ oc new-app myproject/my-ruby~https://github.com/openshift/ruby-hello-world.gitSpecify the builder image and source repository for a local repository by running the following command:
$ oc new-app openshift/ruby-20-centos7:latest~/home/user/code/my-ruby-app
3.3.2. Build strategy and language detection for source applications
You can determine which build strategy and language builder the oc new-app command selects by reviewing files in the root or context directory of your Git repository. Use these detection rules to override the build strategy or specify a builder image when automatic detection does not apply.
3.3.2.1. Build strategy detection
Red Hat OpenShift Service on AWS automatically determines which build strategy to use by detecting certain files:
If a
Jenkinsfileexists in the root or specified context directory of the source repository when creating a new application, Red Hat OpenShift Service on AWS generates a pipeline build strategy.NoteThe
pipelinebuild strategy is deprecated; consider using Red Hat OpenShift Pipelines instead.-
If a
Dockerfileexists in the root or specified context directory of the source repository when creating a new application, Red Hat OpenShift Service on AWS generates a docker build strategy. -
If neither a
Jenkinsfilenor aDockerfileis detected, Red Hat OpenShift Service on AWS generates a source build strategy.
3.3.2.2. Language detection
If you use the source build strategy, new-app detects the language builder from certain files in the root or context directory of the repository.
| Language | Files |
|---|---|
|
|
|
|
|
|
|
|
|
|
|
|
|
|
|
|
|
|
|
|
|
|
|
|
After a language is detected, the new-app command searches the Red Hat OpenShift Service on AWS server for image stream tags with a matching supports annotation or image streams that match the language name. If a match is not found, the new-app command searches the Docker Hub registry for an image that matches the detected language based on name.
When you specify an image and repository with the ~ separator, build strategy detection and language detection are not carried out.
Language detection requires the Git client to be locally installed so that your repository can be cloned and inspected. If Git is not available, you can avoid the language detection step by specifying the builder image to use with your repository with the <image>~<repository> syntax.
The -i <image> <repository> invocation requires that new-app attempt to clone repository to determine what type of artifact it is, so the command fails if Git is not available.
The -i <image> --code <repository> invocation requires that new-app clone repository to learn whether image is a builder for the source or a separate deployment, such as a database image.
3.3.3. Creating an application from an image
You can use the oc new-app command to create an application from a container image in Docker Hub, a private registry, or an image stream on your cluster. Use this procedure when you know the container image name or image stream you want to deploy.
Use the command that matches where your container image is stored.
If you specify an image from your local Docker repository, you must ensure that the same image is available to the Red Hat OpenShift Service on AWS cluster nodes.
Prerequisites
-
You have installed the OpenShift CLI (
oc) and logged in to your cluster. - You know the container image name or image stream you want to deploy.
Procedure
Create an application from the Docker Hub MySQL image by running the following command:
$ oc new-app mysqlCreate an application from an image in a private registry by specifying the full image path in the following command:
$ oc new-app myregistry:5000/example/myimageCreate an application from an existing image stream and optional image stream tag by running the following command:
$ oc new-app my-stream:v1
3.3.4. Creating an application from a template
You can use the oc new-app command to create an application from a template stored in your project or from a template file on your local system. Use this procedure when you have a template JSON or YAML file, or a template in the template library of your current project.
Prerequisites
-
You have installed the OpenShift CLI (
oc) and logged in to your cluster. - You have a template JSON or YAML file, or a template stored in the template library of your current project.
Procedure
Upload an application template to the template library of your current project by running the following command:
$ oc create -f examples/sample-app/application-template-stibuild.jsonCreate a new application from a stored template by running the following command:
$ oc new-app ruby-helloworld-sampleCreate a new application from a template file on your local file system without storing it in Red Hat OpenShift Service on AWS by running the following command:
$ oc new-app -f examples/sample-app/application-template-stibuild.jsonSet template parameter values when creating an application by running the following command:
$ oc new-app ruby-helloworld-sample \
    -p ADMIN_USERNAME=admin -p ADMIN_PASSWORD=mypassword
Store template parameters in a file by creating a file such as
helloworld.paramswith the following content:ADMIN_USERNAME=admin ADMIN_PASSWORD=mypasswordYou can store your parameters in a file, then use that file with
--param-filewhen instantiating a template. If you want to read the parameters from standard input, use--param-file=-.Create a new application from a template by using a parameter file by running the following command:
$ oc new-app ruby-helloworld-sample --param-file=helloworld.paramsNoteTo read parameters from standard input, use
--param-file=-.
3.3.5. Customization options for application creation
You can customize how the oc new-app command creates applications by setting names, labels, environment variables, target projects, and other options. Use these flags to control the objects the command generates before you deploy.
| Object | Description |
|---|---|
|
|
A |
|
|
For the |
|
|
A |
|
|
The |
| Other | Other objects can be generated when creating applications from templates, according to the template. |
3.3.5.1. Specifying environment variables
When generating applications from a template, source, or an image, you can use the -e|--env argument to pass environment variables to the application container at run time.
$ oc new-app openshift/postgresql-92-centos7 \
    -e POSTGRESQL_USER=user \
    -e POSTGRESQL_DATABASE=db \
    -e POSTGRESQL_PASSWORD=password
The variables can also be read from file using the --env-file argument. The following is an example file called postgresql.env:
POSTGRESQL_USER=user
POSTGRESQL_DATABASE=db
POSTGRESQL_PASSWORD=password
Read the variables from the file:
$ oc new-app openshift/postgresql-92-centos7 --env-file=postgresql.env
Additionally, environment variables can be given on standard input by using the --env-file=- argument:
$ cat postgresql.env | oc new-app openshift/postgresql-92-centos7 --env-file=-
Any BuildConfig objects created as part of new-app processing are not updated with environment variables passed with the -e|--env or --env-file argument.
3.3.5.2. Specifying build environment variables
When generating applications from a template, source, or an image, you can use the --build-env argument to pass environment variables to the build container at run time:
$ oc new-app openshift/ruby-23-centos7 \
    --build-env HTTP_PROXY=http://myproxy.net:1337/ \
    --build-env GEM_HOME=~/.gem
The variables can also be read from a file using the --build-env-file argument. The following is an example file called ruby.env:
HTTP_PROXY=http://myproxy.net:1337/
GEM_HOME=~/.gem
Read the variables from the file:
$ oc new-app openshift/ruby-23-centos7 --build-env-file=ruby.env
Additionally, environment variables can be given on standard input by using --build-env-file=-:
$ cat ruby.env | oc new-app openshift/ruby-23-centos7 --build-env-file=-3.3.5.3. Specifying labels
When generating applications from source, images, or templates, you can use the -l|--label argument to add labels to the created objects. Labels make it easy to collectively select, configure, and delete objects associated with the application.
$ oc new-app https://github.com/openshift/ruby-hello-world -l name=hello-world3.3.5.4. Viewing the output without creation
You can preview objects without creating them by using -o or --output with a yaml or json value. Redirect the output to a file, edit the file, then create the objects with oc create.
Writing new-app output to a file
$ oc new-app https://github.com/openshift/ruby-hello-world \
    -o yaml > myapp.yaml
Creating objects from an edited file
$ oc create -f myapp.yaml3.3.5.5. Creating objects with different names
Objects created by new-app are normally named after the source repository, or the image used to generate them. You can set the name of the objects produced by adding a --name flag to the command:
$ oc new-app https://github.com/openshift/ruby-hello-world --name=myapp3.3.5.6. Creating objects in a different project
Normally, new-app creates objects in the current project. However, you can create objects in a different project by using the -n|--namespace argument:
$ oc new-app https://github.com/openshift/ruby-hello-world -n myproject3.3.5.7. Creating multiple objects
You can create multiple applications by specifying multiple parameters to new-app. Labels specified in the command line apply to all objects created by the single command. Environment variables apply to all components created from source or images.
To create an application from a source repository and a Docker Hub image:
$ oc new-app https://github.com/openshift/ruby-hello-world mysql
If a source code repository and a builder image are specified as separate arguments, new-app uses the builder image as the builder for the source code repository. If this is not the intent, specify the required builder image for the source using the ~ separator.
3.3.5.8. Grouping images and source in a single pod
You can deploy multiple images together in a single pod. To specify which images to group together, use the + separator. The --group command-line argument can also be used to specify the images that should be grouped together. To group the image built from a source repository with other images, specify the builder image for the source in the group:
$ oc new-app ruby+mysqlTo deploy an image built from source and an external image together:
$ oc new-app \
    ruby~https://github.com/openshift/ruby-hello-world \
    mysql \
    --group=ruby+mysql
3.3.5.9. Searching for images, templates, and other inputs
To search for images, templates, and other inputs for the oc new-app command, add the --search and --list flags. For example, to find all of the images or templates that include PHP:
$ oc new-app --search php3.3.5.10. Setting the import mode
To set the import mode when using oc new-app, add the --import-mode flag. This flag can be appended with Legacy or PreserveOriginal, which provides users the option to create image streams using a single sub-manifest, or all manifests, respectively.
$ oc new-app --image=registry.redhat.io/ubi8/httpd-24:latest --import-mode=Legacy --name=test$ oc new-app --image=registry.redhat.io/ubi8/httpd-24:latest --import-mode=PreserveOriginal --name=test
'%20d='M201.5%20305.5c-13.8%200-24.9-11.1-24.9-24.6%200-13.8%2011.1-24.9%2024.9-24.9%2013.6%200%2024.6%2011.1%2024.6%2024.9%200%2013.6-11.1%2024.6-24.6%2024.6zM504%20256c0%20137-111%20248-248%20248S8%20393%208%20256%20119%208%20256%208s248%20111%20248%20248zm-132.3-41.2c-9.4%200-17.7%203.9-23.8%2010-22.4-15.5-52.6-25.5-86.1-26.6l17.4-78.3%2055.4%2012.5c0%2013.6%2011.1%2024.6%2024.6%2024.6%2013.8%200%2024.9-11.3%2024.9-24.9s-11.1-24.9-24.9-24.9c-9.7%200-18%205.8-22.1%2013.8l-61.2-13.6c-3-.8-6.1%201.4-6.9%204.4l-19.1%2086.4c-33.2%201.4-63.1%2011.3-85.5%2026.8-6.1-6.4-14.7-10.2-24.1-10.2-34.9%200-46.3%2046.9-14.4%2062.8-1.1%205-1.7%2010.2-1.7%2015.5%200%2052.6%2059.2%2095.2%20132%2095.2%2073.1%200%20132.3-42.6%20132.3-95.2%200-5.3-.6-10.8-1.9-15.8%2031.3-16%2019.8-62.5-14.9-62.5zM302.8%20331c-18.2%2018.2-76.1%2017.9-93.6%200-2.2-2.2-6.1-2.2-8.3%200-2.5%202.5-2.5%206.4%200%208.6%2022.8%2022.8%2087.3%2022.8%20110.2%200%202.5-2.2%202.5-6.1%200-8.6-2.2-2.2-6.1-2.2-8.3%200zm7.7-75c-13.6%200-24.6%2011.1-24.6%2024.9%200%2013.6%2011.1%2024.6%2024.6%2024.6%2013.8%200%2024.9-11.1%2024.9-24.6%200-13.8-11-24.9-24.9-24.9z'/%3e%3c/svg%3e)