Chapter 9. Assuming an AWS IAM role for a service account
In Red Hat OpenShift Service on AWS clusters that use the AWS Security Token Service (STS), the OpenShift API server can be enabled to project signed service account tokens that can be used to assume an AWS Identity and Access Management (IAM) role in a pod. If the assumed IAM role has the required AWS permissions, the pods can authenticate against the AWS API using temporary STS credentials to perform AWS operations.
You can use the pod identity webhook to project service account tokens to assume an AWS Identity and Access Management (IAM) role for your own workloads. If the assumed IAM role has the required AWS permissions, the pods can run AWS SDK operations by using temporary STS credentials.
9.1. How service accounts assume AWS IAM roles in SRE owned projects
When you install a Red Hat OpenShift Service on AWS cluster that uses the AWS Security Token Service (STS), cluster-specific Operator AWS Identity and Access Management (IAM) roles are created. These IAM roles permit the Red Hat OpenShift Service on AWS cluster Operators to run core OpenShift functionality.
Cluster Operators use service accounts to assume IAM roles. When a service account assumes an IAM role, temporary STS credentials are provided for the service account to use in the cluster Operator’s pod. If the assumed role has the necessary AWS privileges, the service account can run AWS SDK operations in the pod.
Workflow for assuming AWS IAM roles in SRE owned projects
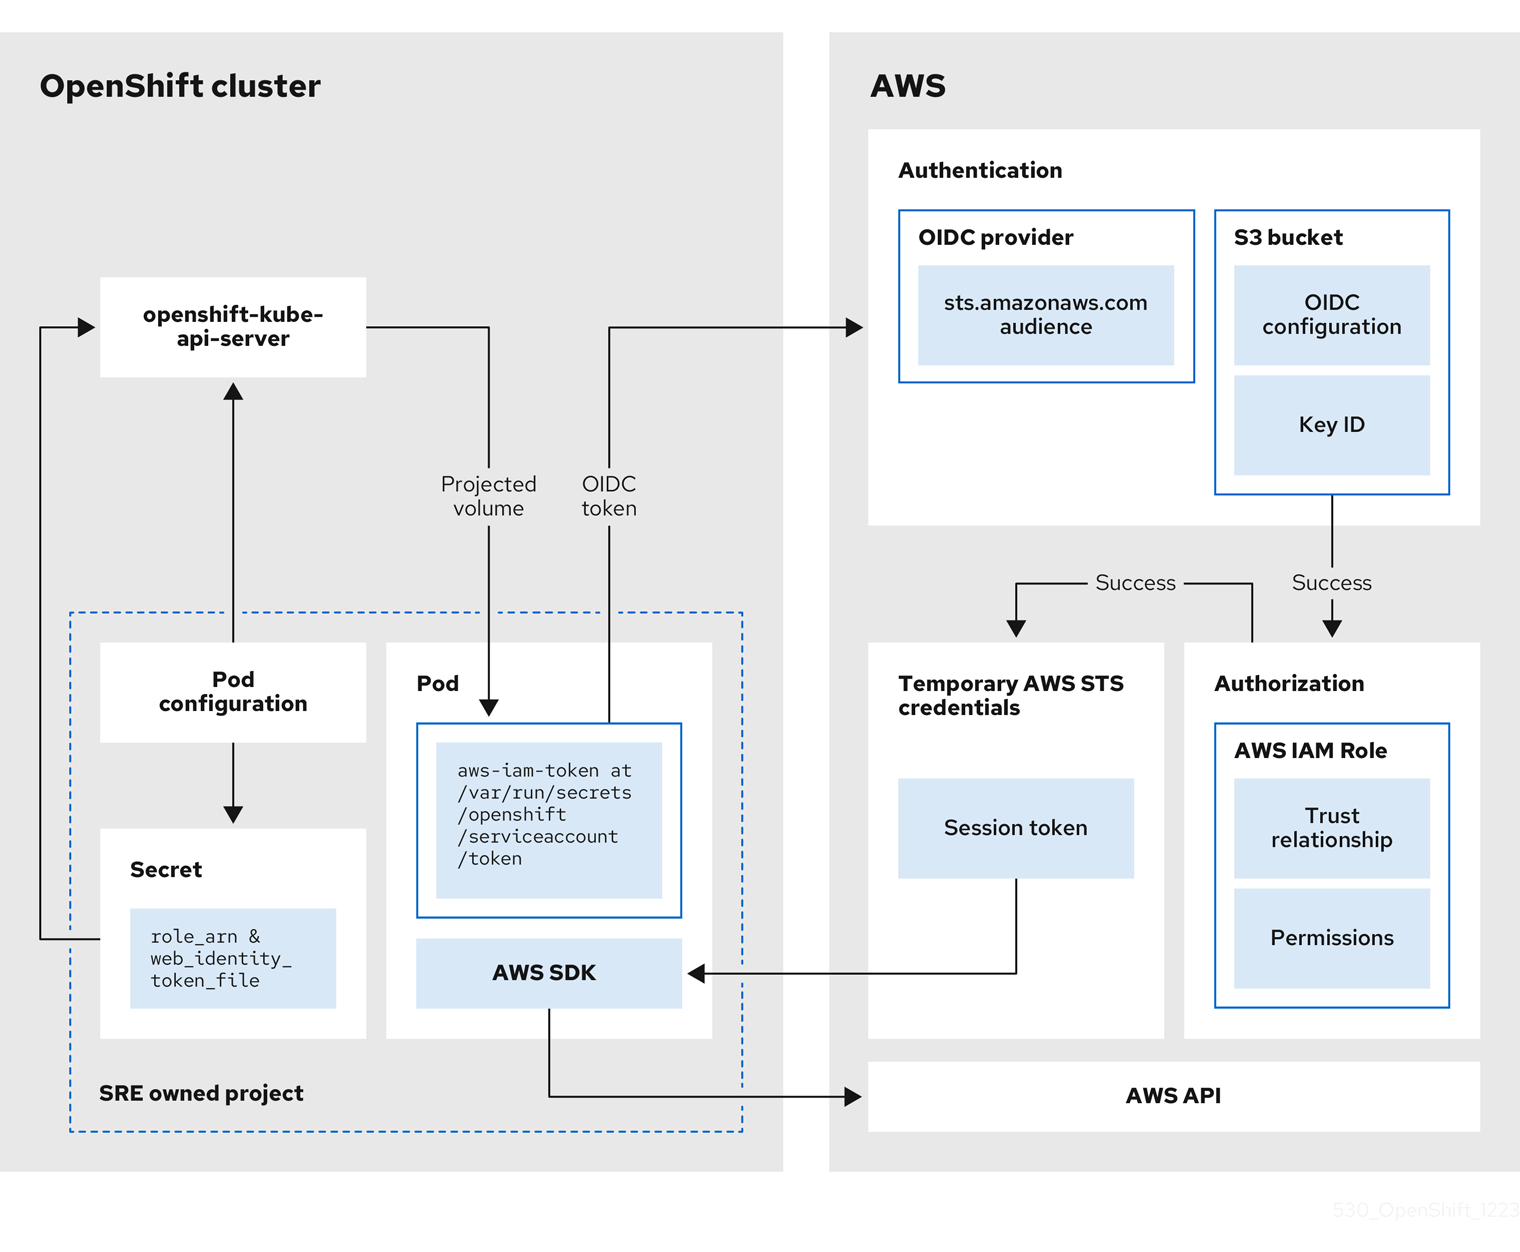
The following diagram illustrates the workflow for assuming AWS IAM roles in SRE owned projects:
Figure 9.1. Workflow for assuming AWS IAM roles in SRE owned projects
The workflow has the following stages:
Within each project that a cluster Operator runs, the Operator’s deployment spec has a volume mount for the projected service account token, and a secret containing AWS credential configuration for the pod. The token is audience-bound and time-bound. Every hour, Red Hat OpenShift Service on AWS generates a new token, and the AWS SDK reads the mounted secret containing the AWS credential configuration. This configuration has a path to the mounted token and the AWS IAM Role ARN. The secret’s credential configuration includes the following:
-
An
$AWS_ARN_ROLEvariable that has the ARN for the IAM role that has the permissions required to run AWS SDK operations. -
An
$AWS_WEB_IDENTITY_TOKEN_FILEvariable that has the full path in the pod to the OpenID Connect (OIDC) token for the service account. The full path is/var/run/secrets/openshift/serviceaccount/token.
-
An
-
When a cluster Operator needs to assume an AWS IAM role to access an AWS service (such as EC2), the AWS SDK client code running on the Operator invokes the
AssumeRoleWithWebIdentityAPI call. The OIDC token is passed from the pod to the OIDC provider. The provider authenticates the service account identity if the following requirements are met:
- The identity signature is valid and signed by the private key.
The
sts.amazonaws.comaudience is listed in the OIDC token and matches the audience configured in the OIDC provider.NoteIn Red Hat OpenShift Service on AWS with STS clusters, the OIDC provider is created during install and set as the service account issuer by default. The
sts.amazonaws.comaudience is set by default in the OIDC provider.- The OIDC token has not expired.
- The issuer value in the token has the URL for the OIDC provider.
- If the project and service account are in the scope of the trust policy for the IAM role that is being assumed, then authorization succeeds.
- After successful authentication and authorization, temporary AWS STS credentials in the form of an AWS access token, secret key, and session token are passed to the pod for use by the service account. By using the credentials, the service account is temporarily granted the AWS permissions enabled in the IAM role.
- When the cluster Operator runs, the Operator that is using the AWS SDK in the pod consumes the secret that has the path to the projected service account and AWS IAM Role ARN to authenticate against the OIDC provider. The OIDC provider returns temporary STS credentials for authentication against the AWS API.
9.2. How service accounts assume AWS IAM roles in user-defined projects
When you install a Red Hat OpenShift Service on AWS cluster that uses the AWS Security Token Service (STS), pod identity webhook resources are included by default.
You can use the pod identity webhook to enable a service account in a user-defined project to assume an AWS Identity and Access Management (IAM) role in a pod in the same project. When the IAM role is assumed, temporary STS credentials are provided for use by the service account in the pod. If the assumed role has the necessary AWS privileges, the service account can run AWS SDK operations in the pod.
To enable the pod identity webhook for a pod, you must create a service account with an eks.amazonaws.com/role-arn annotation in your project. The annotation must reference the Amazon Resource Name (ARN) of the AWS IAM role that you want the service account to assume. You must also reference the service account in your Pod specification and deploy the pod in the same project as the service account.
Pod identity webhook workflow in user-defined projects
The following diagram illustrates the pod identity webhook workflow in user-defined projects:
Figure 9.2. Pod identity webhook workflow in user-defined projects

The workflow has the following stages:
-
Within a user-defined project, a user creates a service account that includes an
eks.amazonaws.com/role-arnannotation. The annotation points to the ARN of the AWS IAM role that you want your service account to assume. When a pod is deployed in the same project using a configuration that references the annotated service account, the pod identity webhook mutates the pod. The mutation injects the following components into the pod without the need to specify them in your
PodorDeploymentresource configurations:-
An
$AWS_ARN_ROLEenvironment variable that contains the ARN for the IAM role that has the permissions required to run AWS SDK operations. -
An
$AWS_WEB_IDENTITY_TOKEN_FILEenvironment variable that contains the full path in the pod to the OpenID Connect (OIDC) token for the service account. The full path is/var/run/secrets/eks.amazonaws.com/serviceaccount/token. -
An
aws-iam-tokenvolume mounted on the mount point/var/run/secrets/eks.amazonaws.com/serviceaccount. An OIDC token file namedtokenis contained in the volume.
-
An
The OIDC token is passed from the pod to the OIDC provider. The provider authenticates the service account identity if the following requirements are met:
- The identity signature is valid and signed by the private key.
The
sts.amazonaws.comaudience is listed in the OIDC token and matches the audience configured in the OIDC provider.NoteThe pod identity webhook applies the
sts.amazonaws.comaudience to the OIDC token by default.In Red Hat OpenShift Service on AWS with STS clusters, the OIDC provider is created during install and set as the service account issuer by default. The
sts.amazonaws.comaudience is set by default in the OIDC provider.- The OIDC token has not expired.
- The issuer value in the token contains the URL for the OIDC provider.
- If the project and service account are in the scope of the trust policy for the IAM role that is being assumed, then authorization succeeds.
- After successful authentication and authorization, temporary AWS STS credentials in the form of a session token are passed to the pod for use by the service account. By using the credentials, the service account is temporarily granted the AWS permissions enabled in the IAM role.
- When you run AWS SDK operations in the pod, the service account provides the temporary STS credentials to the AWS API to verify its identity.
9.3. Assuming an AWS IAM role in your own pods
Follow the procedures in this section to enable a service account to assume an AWS Identity and Access Management (IAM) role in a pod deployed in a user-defined project.
You can create the required resources, including an AWS IAM role, a service account, a container image that includes an AWS SDK, and a pod deployed by using the image. In the example, the AWS Boto3 SDK for Python is used. You can also verify that the pod identity webhook mutates the AWS environment variables, the volume mount, and the token volume into your pod. Additionally, you can check that the service account assumes the AWS IAM role in your pod and can successfully run AWS SDK operations.
9.3.1. Setting up an AWS IAM role for a service account
Create an AWS Identity and Access Management (IAM) role to be assumed by a service account in your Red Hat OpenShift Service on AWS cluster. Attach the permissions that are required by your service account to run AWS SDK operations in a pod.
Prerequisites
- You have the permissions required to install and configure IAM roles in your AWS account.
- You have access to a Red Hat OpenShift Service on AWS cluster that uses the AWS Security Token Service (STS). Admin-level user privileges are not required.
You have the Amazon Resource Name (ARN) for the OpenID Connect (OIDC) provider that is configured as the service account issuer in your Red Hat OpenShift Service on AWS with STS cluster.
NoteIn Red Hat OpenShift Service on AWS with STS clusters, the OIDC provider is created during install and set as the service account issuer by default. If you do not know the OIDC provider ARN, contact your cluster administrator.
-
You have installed the AWS CLI (
aws).
Procedure
Create a file named
trust-policy.jsonwith the following JSON configuration:{ "Version": "2012-10-17", "Statement": [ { "Effect": "Allow", "Principal": { "Federated": "<oidc_provider_arn>" 1 }, "Action": "sts:AssumeRoleWithWebIdentity", "Condition": { "StringEquals": { "<oidc_provider_name>:sub": "system:serviceaccount:<project_name>:<service_account_name>" 2 } } } ] }- 1
- Replace
<oidc_provider_arn>with the ARN of your OIDC provider, for examplearn:aws:iam::<aws_account_id>:oidc-provider/rh-oidc.s3.us-east-1.amazonaws.com/1v3r0n44npxu4g58so46aeohduomfres. - 2
- Limits the role to the specified project and service account. Replace
<oidc_provider_name>with the name of your OIDC provider, for examplerh-oidc.s3.us-east-1.amazonaws.com/1v3r0n44npxu4g58so46aeohduomfres. Replace<project_name>:<service_account_name>with your project name and service account name, for examplemy-project:test-service-account.NoteAlternatively, you can limit the role to any service account within the specified project by using
"<oidc_provider_name>:sub": "system:serviceaccount:<project_name>:*". If you supply the*wildcard, you must replaceStringEqualswithStringLikein the preceding line.
Create an AWS IAM role that uses the trust policy that is defined in the
trust-policy.jsonfile:$ aws iam create-role \ --role-name <aws_iam_role_name> \ 1 --assume-role-policy-document file://trust-policy.json 2Example output
ROLE    arn:aws:iam::<aws_account_id>:role/<aws_iam_role_name>        2022-09-28T12:03:17+00:00       /       AQWMS3TB4Z2N3SH7675JK   <aws_iam_role_name>
ASSUMEROLEPOLICYDOCUMENT        2012-10-17
STATEMENT       sts:AssumeRoleWithWebIdentity   Allow
STRINGEQUALS    system:serviceaccount:<project_name>:<service_account_name>
PRINCIPAL       <oidc_provider_arn>
Retain the ARN for the role in the output. The format of the role ARN is
arn:aws:iam::<aws_account_id>:role/<aws_iam_role_name>.Attach any managed AWS permissions that are required when the service account runs AWS SDK operations in your pod:
$ aws iam attach-role-policy \ --policy-arn arn:aws:iam::aws:policy/ReadOnlyAccess \ 1 --role-name <aws_iam_role_name> 2- Optional: Add custom attributes or a permissions boundary to the role. For more information, see Creating a role to delegate permissions to an AWS service in the AWS documentation.
9.3.2. Creating a service account in your project
Add a service account in your user-defined project. Include an eks.amazonaws.com/role-arn annotation in the service account configuration that references the Amazon Resource Name (ARN) for the AWS Identity and Access Management (IAM) role that you want the service account to assume.
Prerequisites
- You have created an AWS IAM role for your service account. For more information, see Setting up an AWS IAM role for a service account.
- You have access to a Red Hat OpenShift Service on AWS with AWS Security Token Service (STS) cluster. Admin-level user privileges are not required.
-
You have installed the OpenShift CLI (
oc).
Procedure
In your Red Hat OpenShift Service on AWS cluster, create a project:
$ oc new-project <project_name> 1- 1
- Replace
<project_name>with the name of your project. The name must match the project name that you specified in your AWS IAM role configuration.
NoteYou are automatically switched to the project when it is created.
Create a file named
test-service-account.yamlwith the following service account configuration:apiVersion: v1 kind: ServiceAccount metadata: name: <service_account_name> 1 namespace: <project_name> 2 annotations: eks.amazonaws.com/role-arn: "<aws_iam_role_arn>" 3
- 1
- Replace
<service_account_name>with the name of your service account. The name must match the service account name that you specified in your AWS IAM role configuration. - 2
- Replace
<project_name>with the name of your project. The name must match the project name that you specified in your AWS IAM role configuration. - 3
- Specifies the ARN of the AWS IAM role that the service account assumes for use within your pod. Replace
<aws_iam_role_arn>with the ARN for the AWS IAM role that you created for your service account. The format of the role ARN isarn:aws:iam::<aws_account_id>:role/<aws_iam_role_name>.
Create the service account in your project:
$ oc create -f test-service-account.yaml
Example output
serviceaccount/<service_account_name> created
Review the details of the service account:
$ oc describe serviceaccount <service_account_name> 1- 1
- Replace
<service_account_name>with the name of your service account.
Example output
Name:                <service_account_name> 1
Namespace:           <project_name> 2
Labels:              <none>
Annotations:         eks.amazonaws.com/role-arn: <aws_iam_role_arn> 3
Image pull secrets:  <service_account_name>-dockercfg-rnjkq
Mountable secrets:   <service_account_name>-dockercfg-rnjkq
Tokens:              <service_account_name>-token-4gbjp
Events:              <none>
9.3.3. Creating an example AWS SDK container image
The steps in this procedure provide an example method to create a container image that includes an AWS SDK.
The example steps use Podman to create the container image and Quay.io to host the image. For more information about Quay.io, see Getting Started with Quay.io. The container image can be used to deploy pods that can run AWS SDK operations.
In this example procedure, the AWS Boto3 SDK for Python is installed into a container image. For more information about installing and using the AWS Boto3 SDK, see the AWS Boto3 documentation. For details about other AWS SDKs, see AWS SDKs and Tools Reference Guide in the AWS documentation.
Prerequisites
- You have installed Podman on your installation host.
- You have a Quay.io user account.
Procedure
Add the following configuration to a file named
Containerfile:FROM ubi9/ubi 1 RUN dnf makecache && dnf install -y python3-pip && dnf clean all && pip3 install boto3>=1.15.0 2
From the directory that contains the file, build a container image named
awsboto3sdk:$ podman build -t awsboto3sdk .
Log in to Quay.io:
$ podman login quay.io
Tag the image in preparation for the upload to Quay.io:
$ podman tag localhost/awsboto3sdk quay.io/<quay_username>/awsboto3sdk:latest 1- 1
- Replace
<quay_username>with your Quay.io username.
Push the tagged container image to Quay.io:
$ podman push quay.io/<quay_username>/awsboto3sdk:latest 1- 1
- Replace
<quay_username>with your Quay.io username.
Make the Quay.io repository that contains the image public. This publishes the image so that it can be used to deploy a pod in your Red Hat OpenShift Service on AWS cluster:
- On https://quay.io/, navigate to the Repository Settings page for repository that contains the image.
- Click Make Public to make the repository publicly available.
9.3.4. Deploying a pod that includes an AWS SDK
Deploy a pod in a user-defined project from a container image that includes an AWS SDK. In your pod configuration, specify the service account that includes the eks.amazonaws.com/role-arn annotation.
With the service account reference in place for your pod, the pod identity webhook injects the AWS environment variables, the volume mount, and the token volume into your pod. The pod mutation enables the service account to automatically assume the AWS IAM role in the pod.
Prerequisites
- You have created an AWS Identity and Access Management (IAM) role for your service account. For more information, see Setting up an AWS IAM role for a service account.
- You have access to a Red Hat OpenShift Service on AWS cluster that uses the AWS Security Token Service (STS). Admin-level user privileges are not required.
-
You have installed the OpenShift CLI (
oc). -
You have created a service account in your project that includes an
eks.amazonaws.com/role-arnannotation that references the Amazon Resource Name (ARN) for the IAM role that you want the service account to assume. You have a container image that includes an AWS SDK and the image is available to your cluster. For detailed steps, see Creating an example AWS SDK container image.
NoteIn this example procedure, the AWS Boto3 SDK for Python is used. For more information about installing and using the AWS Boto3 SDK, see the AWS Boto3 documentation. For details about other AWS SDKs, see AWS SDKs and Tools Reference Guide in the AWS documentation.
Procedure
Create a file named
awsboto3sdk-pod.yamlwith the following pod configuration:apiVersion: v1 kind: Pod metadata: namespace: <project_name> 1 name: awsboto3sdk 2 spec: securityContext: runAsNonRoot: true seccompProfile: type: RuntimeDefault serviceAccountName: <service_account_name> 3 containers: - name: awsboto3sdk image: quay.io/<quay_username>/awsboto3sdk:latest 4 command: - /bin/bash - "-c" - "sleep 100000" 5 securityContext: allowPrivilegeEscalation: false capabilities: drop: [ALL] terminationGracePeriodSeconds: 0 restartPolicy: Never
- 1
- Replace
<project_name>with the name of your project. The name must match the project name that you specified in your AWS IAM role configuration. - 2
- Specifies the name of the pod.
- 3
- Replace
<service_account_name>with the name of the service account that is configured to assume the AWS IAM role. The name must match the service account name that you specified in your AWS IAM role configuration. - 4
- Specifies the location of your
awsboto3sdkcontainer image. Replace<quay_username>with your Quay.io username. - 5
- In this example pod configuration, this line keeps the pod running for 100000 seconds to enable verification testing in the pod directly. For detailed verification steps, see Verifying the assumed IAM role in your pod.
Deploy an
awsboto3sdkpod:$ oc create -f awsboto3sdk-pod.yaml
Example output
pod/awsboto3sdk created
9.3.5. Verifying the assumed IAM role in your pod
After deploying an awsboto3sdk pod in your project, verify that the pod identity webhook has mutated the pod. Check that the required AWS environment variables, volume mount, and OIDC token volume are present within the pod.
You can also verify that the service account assumes the AWS Identity and Access Management (IAM) role for your AWS account when you run AWS SDK operations in the pod.
Prerequisites
- You have created an AWS IAM role for your service account. For more information, see Setting up an AWS IAM role for a service account.
- You have access to a Red Hat OpenShift Service on AWS cluster that uses the AWS Security Token Service (STS). Admin-level user privileges are not required.
-
You have installed the OpenShift CLI (
oc). -
You have created a service account in your project that includes an
eks.amazonaws.com/role-arnannotation that references the Amazon Resource Name (ARN) for the IAM role that you want the service account to assume. You have deployed a pod in your user-defined project that includes an AWS SDK. The pod references the service account that uses the pod identity webhook to assume the AWS IAM role required to run the AWS SDK operations. For detailed steps, see Deploying a pod that includes an AWS SDK.
NoteIn this example procedure, a pod that includes the AWS Boto3 SDK for Python is used. For more information about installing and using the AWS Boto3 SDK, see the AWS Boto3 documentation. For details about other AWS SDKs, see AWS SDKs and Tools Reference Guide in the AWS documentation.
Procedure
Verify that the AWS environment variables, the volume mount, and the OIDC token volume are listed in the description of the deployed
awsboto3sdkpod:$ oc describe pod awsboto3sdk
Example output
Name: awsboto3sdk Namespace: <project_name> ... Containers: awsboto3sdk: ... Environment: AWS_ROLE_ARN: <aws_iam_role_arn> 1 AWS_WEB_IDENTITY_TOKEN_FILE: /var/run/secrets/eks.amazonaws.com/serviceaccount/token 2 Mounts: /var/run/secrets/eks.amazonaws.com/serviceaccount from aws-iam-token (ro) 3 ... Volumes: aws-iam-token: 4 Type: Projected (a volume that contains injected data from multiple sources) TokenExpirationSeconds: 86400 ...- 1
- Lists the
AWS_ROLE_ARNenvironment variable that was injected into the pod by the pod identity webhook. The variable contains the ARN of the AWS IAM role to be assumed by the service account. - 2
- Lists the
AWS_WEB_IDENTITY_TOKEN_FILEenvironment variable that was injected into the pod by the pod identity webhook. The variable contains the full path of the OIDC token that is used to verify the service account identity. - 3
- Lists the volume mount that was injected into the pod by the pod identity webhook.
- 4
- Lists the
aws-iam-tokenvolume that is mounted onto the/var/run/secrets/eks.amazonaws.com/serviceaccountmount point. The volume contains the OIDC token that is used to authenticate the service account to assume the AWS IAM role.
Start an interactive terminal in the
awsboto3sdkpod:$ oc exec -ti awsboto3sdk -- /bin/sh
In the interactive terminal for the pod, verify that the
$AWS_ROLE_ARNenvironment variable was mutated into the pod by the pod identity webhook:$ echo $AWS_ROLE_ARN
Example output
arn:aws:iam::<aws_account_id>:role/<aws_iam_role_name> 1- 1
- The output must specify the ARN for the AWS IAM role that has the permissions required to run AWS SDK operations.
In the interactive terminal for the pod, verify that the
$AWS_WEB_IDENTITY_TOKEN_FILEenvironment variable was mutated into the pod by the pod identity webhook:$ echo $AWS_WEB_IDENTITY_TOKEN_FILE
Example output
/var/run/secrets/eks.amazonaws.com/serviceaccount/token 1- 1
- The output must specify the full path in the pod to the OIDC token for the service account.
In the interactive terminal for the pod, verify that the
aws-iam-tokenvolume mount containing the OIDC token file was mounted by the pod identity webhook:$ mount | grep -is 'eks.amazonaws.com'
Example output
tmpfs on /run/secrets/eks.amazonaws.com/serviceaccount type tmpfs (ro,relatime,seclabel,size=13376888k)
In the interactive terminal for the pod, verify that an OIDC token file named
tokenis present on the/var/run/secrets/eks.amazonaws.com/serviceaccount/mount point:$ ls /var/run/secrets/eks.amazonaws.com/serviceaccount/token
Example output
/var/run/secrets/eks.amazonaws.com/serviceaccount/token 1- 1
- The OIDC token file in the
aws-iam-tokenvolume that was mounted in the pod by the pod identity webhook. The token is used to authenticate the identity of the service account in AWS.
In the pod, verify that AWS Boto3 SDK operations run successfully:
In the interactive terminal for the pod, start a Python 3 shell:
$ python3
In the Python 3 shell, import the
boto3module:>>> import boto3
Create a variable that includes the Boto3
s3service resource:>>> s3 = boto3.resource('s3')Print the names of all of the S3 buckets in your AWS account:
>>> for bucket in s3.buckets.all():
...     print(bucket.name)
...
Example output
<bucket_name>
<bucket_name>
<bucket_name>
...
If the service account successfully assumed the AWS IAM role, the output lists all of the S3 buckets that are available in your AWS account.
9.4. Additional resources
- For more information about using AWS IAM roles with service accounts, see IAM roles for service accounts in the AWS documentation.
- For information about AWS IAM role delegation, see Creating a role to delegate permissions to an AWS service in the AWS documentation.
- For details about AWS SDKs, see AWS SDKs and Tools Reference Guide in the AWS documentation.
- For more information about installing and using the AWS Boto3 SDK for Python, see the AWS Boto3 documentation.
- For general information about webhook admission plugins for OpenShift, see Webhook admission plugins in the OpenShift Container Platform documentation.